TUESDAY TURNAROUND
Still Cute & Cuddly
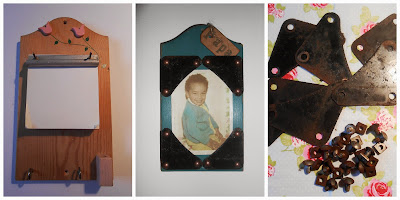
Hello and welcome to the first "Tuesday Turnaround". I picked up this old note board at one of our local charity shops and the brackets were from a rusted metal shelving unit that we took out of the old shed. The rest went off to the recycling centre but I was able to rescue seven of the brackets, the others were even beyond WD40!!
Inspired by the upcoming Father's Day and this adorable baby photo of The Other off to the playroom I went. He still has those twinkly eyes and that cheeky smile!!
The old board was once upon a time a note board but the cover over the paper pad had broken off, there was something missing from the bottom and the wooden pencil holder and tulips were truly glued on! First thing was to strip all the bits off, I have kept them all as I expect they will appear someplace else! Lots of filling and sanding followed!
Now for the fun part.. I used another Craig & Rose chalky emulsion - "French Turquoise" - possibly my new favourite colour!! I gave it two coats all over then using wirewool distressed the edges of the front.
I applied three coats of Colron's beeswax in "Georgian Medium Oak" to the front and sides paying particular attention to the distressed edges. I used the "Natural" beeswax to the back. I'm sorry - once again I have forgotten to take a photo of the front at this point - got carried away!
Inbetween coats of paint and wax I also set upon the brackets. Using a wire brush I removed the loose rust and then gave them a good wash in hot water and disinfectant. Once I had dried them I applied two coats of a clear lacquer to both sides. I had the bolts for these but I opted to go for upholstery nails in an antique finish. As I did not want the brackets to sit flat on the board (I needed to slide the photo in there!) I glued some old cardboard washers to the backside of the holes.
I then used a piece of card to decide where I needed the brackets to go and I nailed them in place.
I printed a copy of the original photo reduced to approx A6 size. Trimmed and mounted on lovely textured linen card. I originally had some jute twine for hanging but I didn't like the way it hung on the wall so I put a sawtooth hanger to the back. Not wanting to waste the twine (not really!) I inked a Kraft tag around the edges and stamped Papa on. Now it looked finished!
Thank you for reading. I would love to hear your comments.
This is available on Etsy here minus my cute and cuddly!
Loves & Hugs. Lor.xx
I loved making this and if you have been inspired to make similar please do show and tell! I have NOT been sponsored/compensated from anyone for this post - this is my time and money so please if you use any of my images have the good manners to link back to this post - thank you. Courtesy will reward you multiple times, cheating will cost you many more!
http://www.elizabethandcovintage.com/2015/05/be-inspired-features-and-link-party-163.html
http://bellarosaantiques.blogspot.co.uk/2015/05/lets-talk-vintage-31-antiquing-small.html
http://www.dagmarbleasdale.com/2015/05/thrifty-vintage-finds-link-party-66-vintage-mirror/
http://diybydesign.blogspot.co.uk/2015/05/swing-into-spring-its-party-219.html?utm_source=feedburner&utm_medium=email&utm_campaign=Feed:


What a great transformation! I have never used either of those products but can't wait to check them out!
ReplyDeleteThank you so much for sharing with me for Something to Talk About!
Karen
Thank you Karen. I love both of these products especially the paint - a very old and traditional UK paint company. Thank you for a wonderful party. Lor.xx
Delete