Tuesday 19 May 2015

ANY OTHER BUSINESS..

Bobcats Rule!


Welcome to the first "Any Other Business" - where I share some of the casual chaos that exists in my home!!

We have been saving the pennies for a couple of years so that we could blitz the garden - well put in some more hard structure. We needed a shed taking out, and a brick one building (I only wanted a mitre saw!), a very large and awkward brick raised bed taking out and new ones built (maybe sleepers?) and a moss bed replaced with a patio/seating and dining area. Though none of this is set in stone!!

Lots of photos....


This large bed made this area of the garden practically un-usable - it had to go! But first we rescued some hollies, hazels, hostas and hydrangeas - anyone else notice a pattern? Oh and lots of hyacinths and bluebells!! Sleeper beds to go in here, but first - someone left the hose on....


This area was so incredibly overgrown when we moved in we didn't even know it was a brick wall and that there was a back gate! I shall try and find some of the before "Before" photos. The soil here is heavy clay so all that would grow here was moss! Bobcat on the job... area cleared and basic shape for new dining area. This area gets sun all afternoon and into the evening - perfect for enjoying the last of the sun during the summer!


The biggest job... The garden is over a foot higher than the drive so this area had to be all dug out to bring us level with the drive as we are taking a few feet off the drive. It is a big drive - you could park four 4x4s on it! We don't need that much space - now we can still easily park four normal sized cars!

I cheered when this shed went down. I had a very bad experience with it last summer - still makes me shake thinking about it. The Other told me I leapt so high he thought I was going to hurdle the fence!!

Bobcat again.. And then it rained and rained and rained..


Somewhere under all that water are the footings to my shed! Think MPs expenses, duck houses and moats - well what else could I do? A conversation with my #2 went along the lines "Tesco, your ducks don't float in my moat!"

A couple of hours in wellies with a pump we got it emptied - happy to report all ducks were rescued and are thriving! At last blocks and bricks going up. Hopefully by next Thursday there will actually be a shed of sorts here (fingers crossed).

On a much brighter note, if the weather allows, I am hoping to get these planted up!
The jugs and colanders have been simply spray painted. 


I found a few of the original photos... the house had been empty for over a year and the old lady that had lived there was unable to do anything in the garden..


Thank you for reading this far. I would love to hear your feedback. Have a wonderful day. See you soon. Loves & Hugs. Lor.xx


Sunday 17 May 2015

WEEKEND WORK UP

Old door - New look


Welcome to another Weekend Work Up - actually this project was completed over a few weekends - in between life, work, family... you know how that works!
When we bought our rather very neglected house there was an amazing front door - or rather it had once been an amazing front door!


The stained glass panel was cracked and a lot of the lead work had been "fixed" with what looked like a mortar type grout thingy! The lower half of the door had lovely panels that were unfortunately splitting - this was one neglected, sad and very draughty front door! The glass panels on the top and sides rattled every time you touched the door and the whole thing moved when opening or shutting the door! It had to be replaced!

We had a new unit made that is pretty close to the original. Those side panels are called "Tulip" glass and that is still available and that for us is fairly meaningful as we spent a good few years living and working in The Hague - our two youngest were practically brought up there and definitely consider themselves Dutch. The design in the main glass panel in the door was reproduced in an etched version - love it! Also, the gas bill was reduced significantly!

But, we did not toss that old door out! We sawed her in half! The glass panel will someday be repaired and hung somewhere and the lower half was taken apart so that I could play with the panels. They were in a sorry state! 


As the old finish was flaking away I gave them all a good sanding and clean. Looking better already! Some filling had to be done as well - I used a ready made brown wood filler. Sanded again - 


One weekend gone! At this point I am lacking photos - but this time it isn't all my fault! My camera "overwrote" some of the photos as it was getting full - I think that is what all the techie stuff meant anyway! Using Craig & Rose "Grate Black" precious metals paint I applied a couple of coats to the front and back of all the boards. Another weekend went by...


I really love how this paint highlights the grain and feel of the wood - it really brings out the beauty of the panels. Now, I am out of original photos sooo...

I dry brushed some Craig & Rose "Red Barn" chalky emulsion onto the front of all my panels. Here is what C & R say about this colour - "Shaker The rich earthy red colour traditionally used by the Shakers to paint their barns and grain stores" I love this little bit of information you get with these paints!

These photos show the dry brushed Red Barn and a couple of coats of Natural beeswax.


Loving this colour!! I added an old 1927 iron nail to one, a vintage bulldog clip to another and a sweet slate heart and old hook backing plate to the last one!


I love these dated nails! I had to order them from the USA - so I ordered a few!! They will be popping up again soon.


I screwed this old bulldog clip to this one. Some of you may recognise the photo from here.


And finally a slate heart was screwed on, I made a braid using jute twine for the chalk and one of my old backing plates from some vintage hooks. 

So, that is the three small panels done - now for the two large panels!! Again, these photos show the finished article! Red Barn was dry brushed over the Grate Black and a couple of coats of Natural beeswax applied.


For this one I used 4.5" wooden letters, first painted in the Grate Black and then I dry brushed Chalk White over the top. I applied a couple of coats of Natural beeswax and then stuck them to my board using wood glue. In love with this one! 

And finally....


It is so difficult to take photos of mirrors! If anyone has any advise I would love (really need) some! The large wooden heart was done the same way as these ones here. The mirror heart was given a coat of Grate Black followed by Chalk White and then wet distressed. The two hooks are old hooks with the most beautiful back plates! 

Thank you for reading. I would love to hear your comments.

I loved making these and if you have been inspired to make similar please do show and tell! I have NOT been sponsored/compensated from anyone for this post - this is my time and money so please if you use any of my images have the good manners to link back to this post - thank you. Courtesy will reward you multiple times, cheating will cost you many more! 


Tuesday 12 May 2015

TUESDAY TURNAROUND

Still Cute & Cuddly


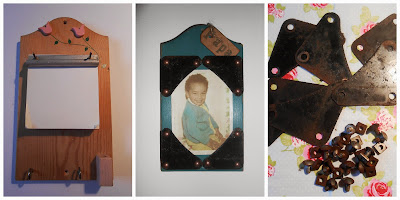
Hello and welcome to the first "Tuesday Turnaround".  I picked up this old note board at one of our local charity shops and the brackets were from a rusted metal shelving unit that we took out of the old shed. The rest went off to the recycling centre but I was able to rescue seven of the brackets, the others were even beyond WD40!! 

Inspired by the upcoming Father's Day and this adorable baby photo of The Other off to the playroom I went. He still has those twinkly eyes and that cheeky smile!!


 The old board was once upon a time a note board but the cover over the paper pad had broken off, there was something missing from the bottom and the wooden pencil holder and tulips were truly glued on! First thing was to strip all the bits off, I have kept them all as I expect they will appear someplace else! Lots of filling and sanding followed!


Now for the fun part.. I used another Craig & Rose chalky emulsion - "French Turquoise" - possibly my new favourite colour!! I gave it two coats all over then using wirewool distressed the edges of the front.

I applied three coats of Colron's beeswax in "Georgian Medium Oak" to the front and sides paying particular attention to the distressed edges. I used the "Natural" beeswax to the back. I'm sorry - once again I have forgotten to take a photo of the front at this point - got carried away! 


Inbetween coats of paint and wax I also set upon the brackets. Using a wire brush I removed the loose rust and then gave them a good wash in hot water and disinfectant. Once I had dried them I applied two coats of a clear lacquer to both sides. I had the bolts for these but I opted to go for upholstery nails in an antique finish. As I did not want the brackets to sit flat on the board (I needed to slide the photo in there!) I glued some old cardboard washers to the backside of the holes.


I then used a piece of card to decide where I needed the brackets to go and I nailed them in place. 


I printed a copy of the original photo reduced to approx A6 size. Trimmed and mounted on lovely textured linen card. I originally had some jute twine for hanging but I didn't like the way it hung on the wall so I put a sawtooth hanger to the back. Not wanting to waste the twine (not really!) I inked a Kraft tag around the edges and stamped Papa on.  Now it looked finished! 


Isn't Wasn't he adorable? He still is really! 


Thank you for reading. I would love to hear your comments.

This is available on Etsy here minus my cute and cuddly!

Loves & Hugs. Lor.xx

I loved making this and if you have been inspired to make similar please do show and tell! I have NOT been sponsored/compensated from anyone for this post - this is my time and money so please if you use any of my images have the good manners to link back to this post - thank you. Courtesy will reward you multiple times, cheating will cost you many more! 


http://www.organizedclutter.net/ 

http://thediydreamer.com/from-dream-to-reality/lets-party-together-167/ 

http://3glol.net/2015/05/11/teach-me-tuesday-55/
 http://www.elizabethandcovintage.com/2015/05/be-inspired-features-and-link-party-163.html 
http://bellarosaantiques.blogspot.co.uk/2015/05/lets-talk-vintage-31-antiquing-small.html 
http://www.dagmarbleasdale.com/2015/05/thrifty-vintage-finds-link-party-66-vintage-mirror/
 http://diybydesign.blogspot.co.uk/2015/05/swing-into-spring-its-party-219.html?utm_source=feedburner&utm_medium=email&utm_campaign=Feed: 

Sunday 10 May 2015

WEEKEND WORKUP

Hearts & Babies


Old Christening gown, copper, vintage child's hanger and several "rescued" old hooks! Oh, and a friend with a brand new baby... What could I do but play?


Somewhere, some time I had bought a few of these heart shaped bamboo cutting boards - I am guessing they must have been on "sale"!! Also I had a new (for me)  Craig & Rose paint to try - this one is Grate Black and is part of their "Precious Metals" range. Here is what they say - "Hard-wearing metallic paints, perfect for all decorative plaster, wood and metalwork. Suitable for both inside and outside."

I decided that as the clean up is warm soapy water and not white spirit these hearts would be the perfect place to try it out. Most of the wood stains I use tend to be white spirit clean up and I really prefer water-based any day.

Sorry, I forgot to take any before pictures of the boards. I love this paint! I was able to move it around the board really well, two coats were all I needed. The recommended drying time is a couple of hours between coats - as I spread it so thinly I was able to re-coat in under 10 minutes! I am thinking that maybe I am not using it quite the way that C & R intended!

With this paint I kept my brush strokes going vertically on the boards. I then used the Craig & Rose "Chalk White" chalky emulsion to dry brush across the boards followed by a couple of coats of natural beeswax (hey, this is also water washable!)


I had these heart shaped photo frames sitting here waiting to be used - some chalk white paint, light wet distressing on the edges and a couple of coats of beeswax to seal the finish.


I drilled a coupe of holes in the boards and using these lovely old hooks that we found in the old shed and wood screws I attached the small hearts to the boards.


I attached a hanging hook to the back, stood back prepared to admire my work... no, it was missing something! Aah, lightbulb moment - I had a new gilding wax from Creative Expressions that I wanted to use so... out with the metal stamps, some copper and label holders.


This was not quite my first time with this gilding wax - I don't think you really need to see the practice runs! I used my finger to dab on, leave for 10 minutes then very lightly buff, leave for a few hours then buff again! This one is called Patina - it is perfect to use with the copper and has a beautiful iridescence to it.


I had this beautiful lawn cotton handmade Christening gown - 1950's I think - the seam finishes are so beautiful - no zig-zag stitches then! Even the small tear on the front has been so wonderfully mended by hand! She was the perfect accompaniment to this heart and one day soon little Emily Jane will have her own gown hanging from here!

I loved making this and if you have been inspired to make similar please do show and tell! I have NOT been sponsored/compensated from anyone for this post - this is my time and money so please if you use any of my images have the good manners to link back to this post - thank you. Courtesy will reward you multiple times, cheating will cost you many more! 

I have another three of these ready to be personalised in my Etsy store at https://www.etsy.com/uk/listing/232874113/new-baby-christening-baptism 

Thank you so much for reading. I would love to hear your feedback. Lor.xx


Tuesday 14 April 2015


To Banana Or Not...

Quite a while ago, on one of my "go to" blogs, I came across this amazing banana holder up grade - Re-purposed banana-stand and knew I had to have one!


Many months later... I came across one in a local charity shop and a few days later came across another one  - a feast or a famine it seems!!

This one had a red upright, I had started painting it black before I remembered to take a photo - too enthusiastic! I used black acrylic paint for this step.


Two coats later, I was so tempted to leave her like this.


Once this was fully dried I applied two light coats of Craig & Rose "Dutch White" chalk paint. Thankfully, this paint dries quickly and I was able to "wet distress" (slightly damp old towel and rub the places where you want wear) then I used a fine wire wool in the parts where I wanted the red to show through!


Happy with the "distressing" I used a soft cloth (old t-shirt) to apply some wax. I use beeswax - personal preference - it's a bit more work but the quality of the sheen and finish is worth it. First up a layer of natural wax and lightly buffed, then a very light layer of the dark - Jacobean Dark Oak applied, brushed in and buffed. Then, finally another layer of the natural wax and buffed and buffed and then buffed again!!


Now the only question is What to hang? Hearts...?


Candle jar...?


One of my pricklies...?


Or even bananas...?


I had to take this photo a day later than the others as when I went to my banana "tree" it had been stripped!! Children!

Some more photos just because...


Love my pricklies - particularly when the care instructions say to let them completely dry out before watering - now that I can do!


If you got this far, thank you! I would love to read your comments and views on this makeover. 
This particular banana stand is now available on Etsy here.

Right, I am off to work out how linkys work!! 
Have a wonderful day. 

Lor.xx